440 lines
14 KiB
Markdown
440 lines
14 KiB
Markdown
|
|
## 下一步做什么?
|
|||
|
|
|
|||
|
|
* **上一部分:** [构建*创建页面表单*](/docs/how-to-guides/data-basics/4-building-a-create-page-form.md)
|
|||
|
|
* (可选)在 block-development-examples 代码库中查看[已完成的应用程序](https://github.com/WordPress/block-development-examples/tree/trunk/plugins/data-basics-59c8f8)
|
|||
|
|
|
|||
|
|
# 添加删除按钮
|
|||
|
|
|
|||
|
|
在[上一章节](/docs/how-to-guides/data-basics/3-building-an-edit-form.md)中,我们实现了新建页面的功能,本章节将为应用添加*删除*功能。
|
|||
|
|
|
|||
|
|
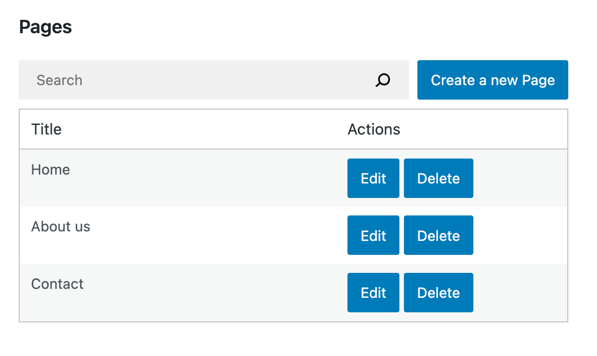
以下是我们即将实现的效果预览:
|
|||
|
|
|
|||
|
|
|
|||
|
|
|
|||
|
|
### 步骤一:添加删除按钮
|
|||
|
|
|
|||
|
|
首先创建 `DeletePageButton` 组件并更新 `PagesList` 组件的用户界面:
|
|||
|
|
|
|||
|
|
```js
|
|||
|
|
import { Button } from '@wordpress/components';
|
|||
|
|
import { decodeEntities } from '@wordpress/html-entities';
|
|||
|
|
|
|||
|
|
const DeletePageButton = () => (
|
|||
|
|
<Button variant="primary">
|
|||
|
|
删除
|
|||
|
|
</Button>
|
|||
|
|
)
|
|||
|
|
|
|||
|
|
function PagesList( { hasResolved, pages } ) {
|
|||
|
|
if ( ! hasResolved ) {
|
|||
|
|
return <Spinner />;
|
|||
|
|
}
|
|||
|
|
if ( ! pages?.length ) {
|
|||
|
|
return <div>暂无数据</div>;
|
|||
|
|
}
|
|||
|
|
|
|||
|
|
return (
|
|||
|
|
<table className="wp-list-table widefat fixed striped table-view-list">
|
|||
|
|
<thead>
|
|||
|
|
<tr>
|
|||
|
|
<td>标题</td>
|
|||
|
|
<td style={{width: 190}}>操作</td>
|
|||
|
|
</tr>
|
|||
|
|
</thead>
|
|||
|
|
<tbody>
|
|||
|
|
{ pages?.map( ( page ) => (
|
|||
|
|
<tr key={page.id}>
|
|||
|
|
<td>{ decodeEntities( page.title.rendered ) }</td>
|
|||
|
|
<td>
|
|||
|
|
<div className="form-buttons">
|
|||
|
|
<PageEditButton pageId={ page.id } />
|
|||
|
|
{/* ↓ 这是 PagesList 组件中的唯一改动 */}
|
|||
|
|
<DeletePageButton pageId={ page.id }/>
|
|||
|
|
</div>
|
|||
|
|
</td>
|
|||
|
|
</tr>
|
|||
|
|
) ) }
|
|||
|
|
</tbody>
|
|||
|
|
</table>
|
|||
|
|
);
|
|||
|
|
}
|
|||
|
|
```
|
|||
|
|
|
|||
|
|
此时 PagesList 的显示效果如下:
|
|||
|
|
|
|||
|
|

|
|||
|
|
|
|||
|
|
### 步骤二:为按钮绑定删除操作
|
|||
|
|
|
|||
|
|
在 Gutenberg 数据层中,我们通过 `deleteEntityRecord` 操作从 WordPress REST API 删除实体记录。该操作会发送请求、处理结果并更新 Redux 状态中的缓存数据。
|
|||
|
|
|
|||
|
|
以下是在浏览器开发者工具中尝试删除实体记录的方法:
|
|||
|
|
|
|||
|
|
```js
|
|||
|
|
// 调用 deleteEntityRecord 需要有效的页面ID,先通过 getEntityRecords 获取首个可用ID
|
|||
|
|
const pageId = wp.data.select( 'core' ).getEntityRecords( 'postType', 'page' )[0].id;
|
|||
|
|
|
|||
|
|
// 执行删除操作:
|
|||
|
|
const promise = wp.data.dispatch( 'core' ).deleteEntityRecord( 'postType', 'page', pageId );
|
|||
|
|
|
|||
|
|
// 当 API 请求成功或失败时,promise 会相应地被解析或拒绝
|
|||
|
|
```
|
|||
|
|
|
|||
|
|
REST API 请求完成后,您会注意到列表中的某个页面已消失。这是因为列表通过 `useSelect()` 钩子和 `select( coreDataStore ).getEntityRecords( 'postType', 'page' )` 选择器动态生成。只要底层数据发生变化,列表就会立即使用新数据重新渲染,这非常便捷!
|
|||
|
|
|
|||
|
|
接下来让我们在点击 `DeletePageButton` 时触发该操作:
|
|||
|
|
|
|||
|
|
```js
|
|||
|
|
const DeletePageButton = ({ pageId }) => {
|
|||
|
|
const { deleteEntityRecord } = useDispatch( coreDataStore );
|
|||
|
|
const handleDelete = () => deleteEntityRecord( 'postType', 'page', pageId );
|
|||
|
|
return (
|
|||
|
|
<Button variant="primary" onClick={ handleDelete }>
|
|||
|
|
删除
|
|||
|
|
</Button>
|
|||
|
|
);
|
|||
|
|
}
|
|||
|
|
```
|
|||
|
|
|
|||
|
|
### 步骤三:添加视觉反馈
|
|||
|
|
|
|||
|
|
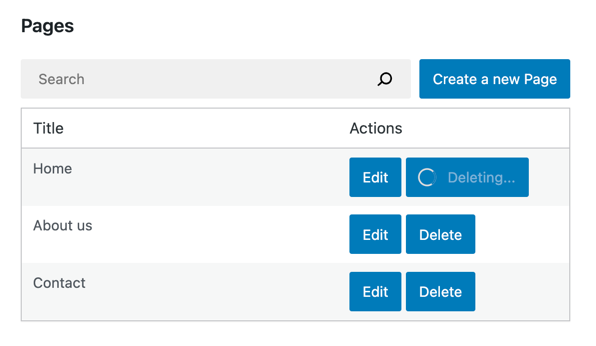
点击*删除*按钮后,REST API 请求可能需要一些时间才能完成。与之前章节类似,我们可以通过 `<Spinner />` 组件来直观展示这一状态。
|
|||
|
|
|
|||
|
|
这里需要使用 `isDeletingEntityRecord` 选择器,它与[第三章节](/docs/how-to-guides/data-basics/3-building-an-edit-form.md)中提到的 `isSavingEntityRecord` 选择器类似:返回 `true` 或 `false` 且不会触发任何 HTTP 请求:
|
|||
|
|
|
|||
|
|
```js
|
|||
|
|
const DeletePageButton = ({ pageId }) => {
|
|||
|
|
// ...
|
|||
|
|
const { isDeleting } = useSelect(
|
|||
|
|
select => ({
|
|||
|
|
isDeleting: select( coreDataStore ).isDeletingEntityRecord( 'postType', 'page', pageId ),
|
|||
|
|
}),
|
|||
|
|
[ pageId ]
|
|||
|
|
)
|
|||
|
|
return (
|
|||
|
|
<Button variant="primary" onClick={ handleDelete } disabled={ isDeleting }>
|
|||
|
|
{ isDeleting ? (
|
|||
|
|
<>
|
|||
|
|
<Spinner />
|
|||
|
|
删除中...
|
|||
|
|
</>
|
|||
|
|
) : '删除' }
|
|||
|
|
</Button>
|
|||
|
|
);
|
|||
|
|
}
|
|||
|
|
```
|
|||
|
|
|
|||
|
|
实际运行效果如下:
|
|||
|
|
|
|||
|
|
|
|||
|
|
|
|||
|
|
### 步骤4:错误处理
|
|||
|
|
|
|||
|
|
我们之前乐观地假设*删除*操作总能成功。但不幸的是,其底层是通过REST API发起的请求,可能因多种原因失败:
|
|||
|
|
|
|||
|
|
* 网站可能宕机
|
|||
|
|
* 删除请求可能无效
|
|||
|
|
* 页面可能已被其他用户删除
|
|||
|
|
|
|||
|
|
为了在发生这些错误时通知用户,我们需要使用`getLastEntityDeleteError`选择器提取错误信息:
|
|||
|
|
|
|||
|
|
```js
|
|||
|
|
// 将9替换为实际页面ID
|
|||
|
|
wp.data.select( 'core' ).getLastEntityDeleteError( 'postType', 'page', 9 )
|
|||
|
|
```
|
|||
|
|
|
|||
|
|
以下是在`DeletePageButton`中的具体实现:
|
|||
|
|
|
|||
|
|
```js
|
|||
|
|
import { useEffect } from 'react';
|
|||
|
|
const DeletePageButton = ({ pageId }) => {
|
|||
|
|
// ...
|
|||
|
|
const { error, /* ... */ } = useSelect(
|
|||
|
|
select => ( {
|
|||
|
|
error: select( coreDataStore ).getLastEntityDeleteError( 'postType', 'page', pageId ),
|
|||
|
|
// ...
|
|||
|
|
} ),
|
|||
|
|
[pageId]
|
|||
|
|
);
|
|||
|
|
useEffect( () => {
|
|||
|
|
if ( error ) {
|
|||
|
|
// 显示错误信息
|
|||
|
|
}
|
|||
|
|
}, [error] )
|
|||
|
|
|
|||
|
|
// ...
|
|||
|
|
}
|
|||
|
|
```
|
|||
|
|
|
|||
|
|
`error`对象来自`@wordpress/api-fetch`,包含以下错误属性:
|
|||
|
|
|
|||
|
|
* `message` – 人类可读的错误信息(如`Invalid post ID`)
|
|||
|
|
* `code` – 字符串型错误代码(如`rest_post_invalid_id`)。所有错误代码需参考[`/v2/pages`端点源码](https://github.com/WordPress/wordpress-develop/blob/2648a5f984b8abf06872151898e3a61d3458a628/src/wp-includes/rest-api/endpoints/class-wp-rest-revisions-controller.php#L226-L230)
|
|||
|
|
* `data`(可选)– 错误详情,包含HTTP响应码的`code`属性
|
|||
|
|
|
|||
|
|
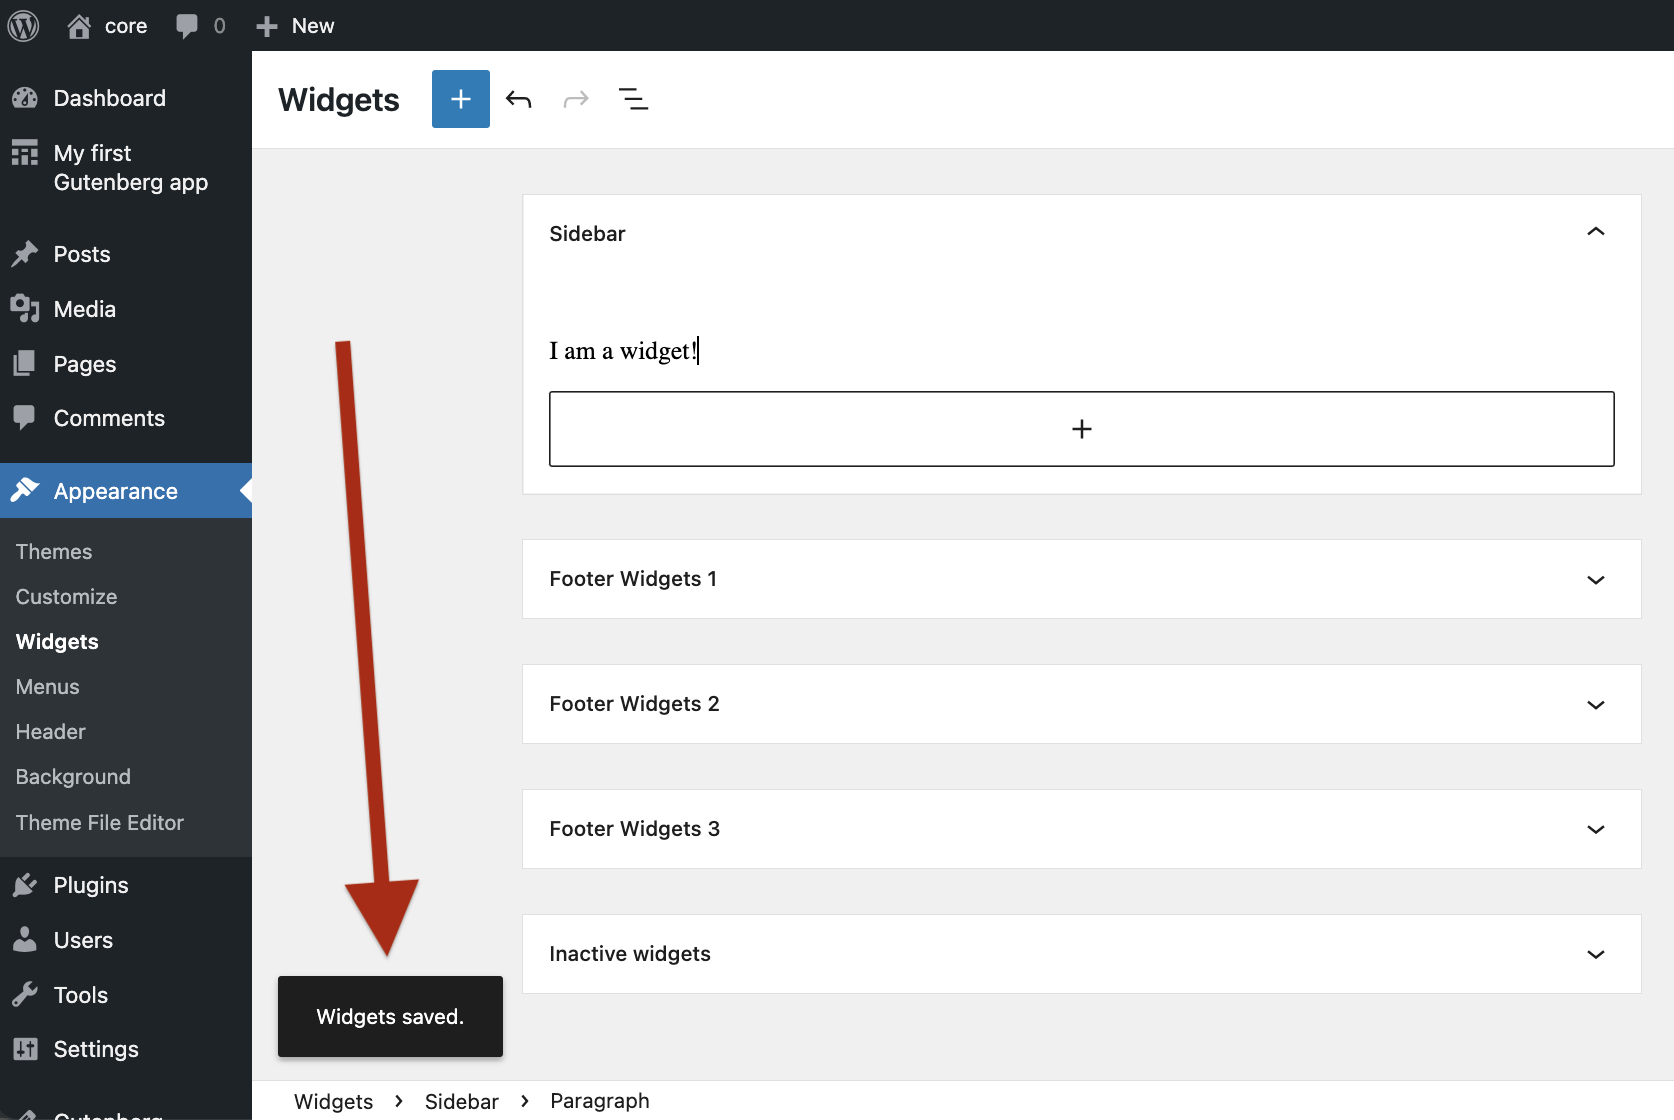
本教程将直接显示`error.message`来转换错误信息。
|
|||
|
|
|
|||
|
|
WordPress采用`Snackbar`组件显示状态信息,下图是**小工具编辑器**中的效果:
|
|||
|
|
|
|||
|
|
|
|||
|
|
|
|||
|
|
现在为插件实现相同通知功能,包含两个部分:
|
|||
|
|
|
|||
|
|
1. 显示通知
|
|||
|
|
2. 触发通知
|
|||
|
|
|
|||
|
|
#### 显示通知
|
|||
|
|
|
|||
|
|
当前应用只能显示页面,需要新增通知显示功能。WordPress提供了完整的React通知组件,其中[`Snackbar`组件](https://wordpress.github.io/gutenberg/?path=/story/components-snackbar--default)可呈现单条通知:
|
|||
|
|
|
|||
|
|

|
|||
|
|
|
|||
|
|
不过我们不会直接使用`Snackbar`,而是采用能显示多条通知、支持平滑动画和自动隐藏的`SnackbarList`组件——这正是小工具编辑器和其他wp-admin页面使用的同款组件!
|
|||
|
|
|
|||
|
|
创建自定义`Notifications`组件:
|
|||
|
|
|
|||
|
|
```js
|
|||
|
|
import { SnackbarList } from '@wordpress/components';
|
|||
|
|
import { store as noticesStore } from '@wordpress/notices';
|
|||
|
|
|
|||
|
|
function Notifications() {
|
|||
|
|
const notices = []; // 此处稍后完善
|
|||
|
|
|
|||
|
|
return (
|
|||
|
|
<SnackbarList
|
|||
|
|
notices={ notices }
|
|||
|
|
className="components-editor-notices__snackbar"
|
|||
|
|
/>
|
|||
|
|
);
|
|||
|
|
}
|
|||
|
|
```
|
|||
|
|
|
|||
|
|
基础框架已搭建,但当前通知列表为空。如何填充?我们将沿用WordPress使用的[`@wordpress/notices`](https://github.com/WordPress/gutenberg/blob/895ca1f6a7d7e492974ea55f693aecbeb1d5bbe3/docs/reference-guides/data/data-core-notices.md)方案:
|
|||
|
|
|
|||
|
|
```js
|
|||
|
|
import { SnackbarList } from '@wordpress/components';
|
|||
|
|
import { store as noticesStore } from '@wordpress/notices';
|
|||
|
|
|
|||
|
|
function Notifications() {
|
|||
|
|
const notices = useSelect(
|
|||
|
|
( select ) => select( noticesStore ).getNotices(),
|
|||
|
|
[]
|
|||
|
|
);
|
|||
|
|
const { removeNotice } = useDispatch( noticesStore );
|
|||
|
|
const snackbarNotices = notices.filter( ({ type }) => type === 'snackbar' );
|
|||
|
|
|
|||
|
|
return (
|
|||
|
|
<SnackbarList
|
|||
|
|
notices={ snackbarNotices }
|
|||
|
|
className="components-editor-notices__snackbar"
|
|||
|
|
onRemove={ removeNotice }
|
|||
|
|
/>
|
|||
|
|
);
|
|||
|
|
}
|
|||
|
|
|
|||
|
|
function MyFirstApp() {
|
|||
|
|
// ...
|
|||
|
|
return (
|
|||
|
|
<div>
|
|||
|
|
{/* ... */}
|
|||
|
|
<Notifications />
|
|||
|
|
</div>
|
|||
|
|
);
|
|||
|
|
}
|
|||
|
|
```
|
|||
|
|
|
|||
|
|
本教程重点在于页面管理,不深入讨论上述代码细节。若想了解`@wordpress/notices`的详细信息,建议查阅[手册页面](https://developer.wordpress.org/block-editor/reference-guides/data/data-core-notices/)。
|
|||
|
|
|
|||
|
|
现在我们已经准备好向用户报告可能发生的错误了。
|
|||
|
|
|
|||
|
|
#### 发送通知
|
|||
|
|
|
|||
|
|
有了 SnackbarNotices 组件后,我们现在可以发送通知了!具体操作如下:
|
|||
|
|
|
|||
|
|
```js
|
|||
|
|
import { useEffect } from 'react';
|
|||
|
|
import { store as noticesStore } from '@wordpress/notices';
|
|||
|
|
function DeletePageButton( { pageId } ) {
|
|||
|
|
const { createSuccessNotice, createErrorNotice } = useDispatch( noticesStore );
|
|||
|
|
// 如果传入存储句柄而非回调函数,useSelect 将返回选择器列表:
|
|||
|
|
const { getLastEntityDeleteError } = useSelect( coreDataStore )
|
|||
|
|
const handleDelete = async () => {
|
|||
|
|
const success = await deleteEntityRecord( 'postType', 'page', pageId);
|
|||
|
|
if ( success ) {
|
|||
|
|
// 告知用户操作成功:
|
|||
|
|
createSuccessNotice( "页面已删除!", {
|
|||
|
|
type: 'snackbar',
|
|||
|
|
} );
|
|||
|
|
} else {
|
|||
|
|
// 在 deleteEntityRecord 执行失败后,直接使用选择器获取最新错误信息
|
|||
|
|
const lastError = getLastEntityDeleteError( 'postType', 'page', pageId );
|
|||
|
|
const message = ( lastError?.message || '出现错误。' ) + ' 请刷新页面后重试。'
|
|||
|
|
// 向用户明确展示操作失败原因:
|
|||
|
|
createErrorNotice( message, {
|
|||
|
|
type: 'snackbar',
|
|||
|
|
} );
|
|||
|
|
}
|
|||
|
|
}
|
|||
|
|
// ...
|
|||
|
|
}
|
|||
|
|
```
|
|||
|
|
|
|||
|
|
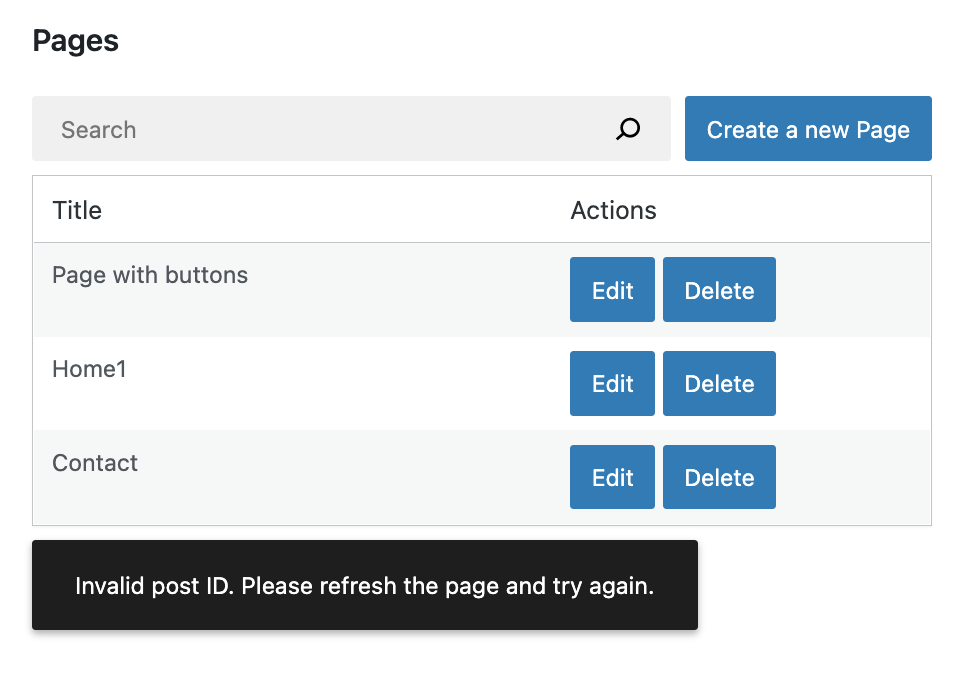
太好了!现在 `DeletePageButton` 已完全具备错误感知能力。让我们看看实际错误提示效果。通过将 `pageId` 乘以一个大数值来触发无效删除操作:
|
|||
|
|
|
|||
|
|
```js
|
|||
|
|
function DeletePageButton( { pageId, onCancel, onSaveFinished } ) {
|
|||
|
|
pageId = pageId * 1000;
|
|||
|
|
// ...
|
|||
|
|
}
|
|||
|
|
```
|
|||
|
|
|
|||
|
|
刷新页面并点击任意 `删除` 按钮后,您将看到如下错误提示:
|
|||
|
|
|
|||
|
|
|
|||
|
|
|
|||
|
|
完美!现在可以**移除 `pageId = pageId * 1000;` 这行代码**。
|
|||
|
|
|
|||
|
|
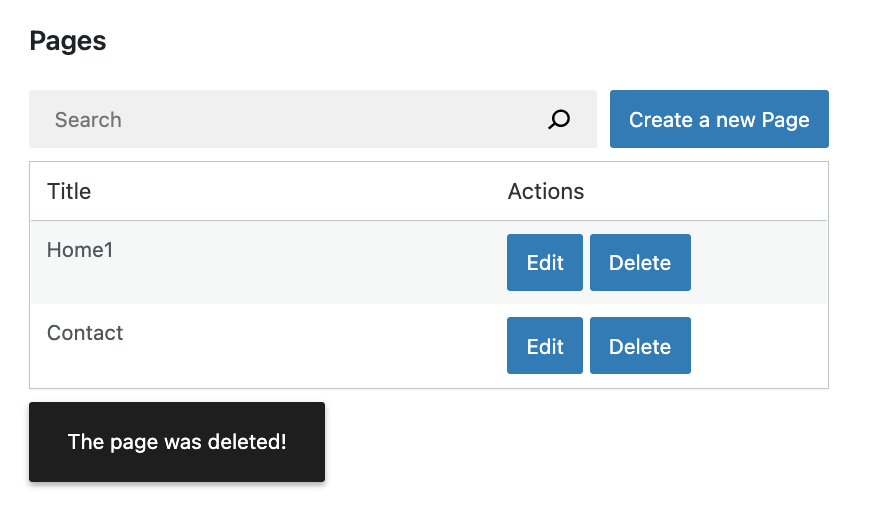
接下来尝试实际删除页面。刷新浏览器并点击删除按钮后,您将看到:
|
|||
|
|
|
|||
|
|
|
|||
|
|
|
|||
|
|
大功告成!
|
|||
|
|
|
|||
|
|
### 完整功能集成
|
|||
|
|
|
|||
|
|
所有组件已就绪,太棒了!以下是本章节完成的所有代码变更:
|
|||
|
|
|
|||
|
|
```js
|
|||
|
|
import { useState, useEffect } from 'react';
|
|||
|
|
import { useSelect, useDispatch } from '@wordpress/data';
|
|||
|
|
import { Button, Modal, TextControl } from '@wordpress/components';
|
|||
|
|
|
|||
|
|
function MyFirstApp() {
|
|||
|
|
const [searchTerm, setSearchTerm] = useState( '' );
|
|||
|
|
const { pages, hasResolved } = useSelect(
|
|||
|
|
( select ) => {
|
|||
|
|
const query = {};
|
|||
|
|
if ( searchTerm ) {
|
|||
|
|
query.search = searchTerm;
|
|||
|
|
}
|
|||
|
|
const selectorArgs = ['postType', 'page', query];
|
|||
|
|
const pages = select( coreDataStore ).getEntityRecords( ...selectorArgs );
|
|||
|
|
return {
|
|||
|
|
pages,
|
|||
|
|
hasResolved: select( coreDataStore ).hasFinishedResolution(
|
|||
|
|
'getEntityRecords',
|
|||
|
|
selectorArgs,
|
|||
|
|
),
|
|||
|
|
};
|
|||
|
|
},
|
|||
|
|
[searchTerm],
|
|||
|
|
);
|
|||
|
|
|
|||
|
|
return (
|
|||
|
|
<div>
|
|||
|
|
<div className="list-controls">
|
|||
|
|
<SearchControl onChange={ setSearchTerm } value={ searchTerm }/>
|
|||
|
|
<PageCreateButton/>
|
|||
|
|
</div>
|
|||
|
|
<PagesList hasResolved={ hasResolved } pages={ pages }/>
|
|||
|
|
<Notifications />
|
|||
|
|
</div>
|
|||
|
|
);
|
|||
|
|
}
|
|||
|
|
|
|||
|
|
function SnackbarNotices() {
|
|||
|
|
const notices = useSelect(
|
|||
|
|
( select ) => select( noticesStore ).getNotices(),
|
|||
|
|
[]
|
|||
|
|
);
|
|||
|
|
const { removeNotice } = useDispatch( noticesStore );
|
|||
|
|
const snackbarNotices = notices.filter( ( { type } ) => type === 'snackbar' );
|
|||
|
|
|
|||
|
|
return (
|
|||
|
|
<SnackbarList
|
|||
|
|
notices={ snackbarNotices }
|
|||
|
|
className="components-editor-notices__snackbar"
|
|||
|
|
onRemove={ removeNotice }
|
|||
|
|
/>
|
|||
|
|
);
|
|||
|
|
}
|
|||
|
|
|
|||
|
|
function PagesList( { hasResolved, pages } ) {
|
|||
|
|
if ( !hasResolved ) {
|
|||
|
|
return <Spinner/>;
|
|||
|
|
}
|
|||
|
|
if ( !pages?.length ) {
|
|||
|
|
return <div>暂无结果</div>;
|
|||
|
|
}
|
|||
|
|
|
|||
|
|
return (
|
|||
|
|
<table className="wp-list-table widefat fixed striped table-view-list">
|
|||
|
|
<thead>
|
|||
|
|
<tr>
|
|||
|
|
<td>标题</td>
|
|||
|
|
<td style={ { width: 190 } }>操作</td>
|
|||
|
|
</tr>
|
|||
|
|
</thead>
|
|||
|
|
<tbody>
|
|||
|
|
{ pages?.map( ( page ) => (
|
|||
|
|
<tr key={ page.id }>
|
|||
|
|
<td>{ page.title.rendered }</td>
|
|||
|
|
<td>
|
|||
|
|
<div className="form-buttons">
|
|||
|
|
<PageEditButton pageId={ page.id }/>
|
|||
|
|
<DeletePageButton pageId={ page.id }/>
|
|||
|
|
</div>
|
|||
|
|
</td>
|
|||
|
|
</tr>
|
|||
|
|
) ) }
|
|||
|
|
</tbody>
|
|||
|
|
</table>
|
|||
|
|
);
|
|||
|
|
}
|
|||
|
|
|
|||
|
|
function DeletePageButton( { pageId } ) {
|
|||
|
|
const { createSuccessNotice, createErrorNotice } = useDispatch( noticesStore );
|
|||
|
|
// 如果传入存储句柄而非回调函数,useSelect 将返回选择器列表:
|
|||
|
|
const { getLastEntityDeleteError } = useSelect( coreDataStore )
|
|||
|
|
const handleDelete = async () => {
|
|||
|
|
const success = await deleteEntityRecord( 'postType', 'page', pageId);
|
|||
|
|
if ( success ) {
|
|||
|
|
// 告知用户操作成功:
|
|||
|
|
createSuccessNotice( "页面已删除!", {
|
|||
|
|
type: 'snackbar',
|
|||
|
|
} );
|
|||
|
|
} else {
|
|||
|
|
// 此时直接使用选择器获取错误信息
|
|||
|
|
// 假设我们通过以下方式获取错误:
|
|||
|
|
// const { lastError } = useSelect( function() { /* ... */ } );
|
|||
|
|
// 那么 lastError 在 handleDelete 内部将显示为 null
|
|||
|
|
// 为什么?因为这里引用的是在 handleDelete 被调用前就计算好的旧版本
|
|||
|
|
const lastError = getLastEntityDeleteError( 'postType', 'page', pageId );
|
|||
|
|
const message = ( lastError?.message || '出现错误。' ) + ' 请刷新页面后重试。'
|
|||
|
|
// 向用户明确展示操作失败原因:
|
|||
|
|
createErrorNotice( message, {
|
|||
|
|
type: 'snackbar',
|
|||
|
|
} );
|
|||
|
|
}
|
|||
|
|
}
|
|||
|
|
|
|||
|
|
const { deleteEntityRecord } = useDispatch( coreDataStore );
|
|||
|
|
const { isDeleting } = useSelect(
|
|||
|
|
select => ( {
|
|||
|
|
isDeleting: select( coreDataStore ).isDeletingEntityRecord( 'postType', 'page', pageId ),
|
|||
|
|
} ),
|
|||
|
|
[ pageId ]
|
|||
|
|
);
|
|||
|
|
|
|||
|
|
return (
|
|||
|
|
<Button variant="primary" onClick={ handleDelete } disabled={ isDeleting }>
|
|||
|
|
{ isDeleting ? (
|
|||
|
|
<>
|
|||
|
|
<Spinner />
|
|||
|
|
删除中...
|
|||
|
|
</>
|
|||
|
|
) : '删除' }
|
|||
|
|
</Button>
|
|||
|
|
);
|
|||
|
|
}
|
|||
|
|
```
|